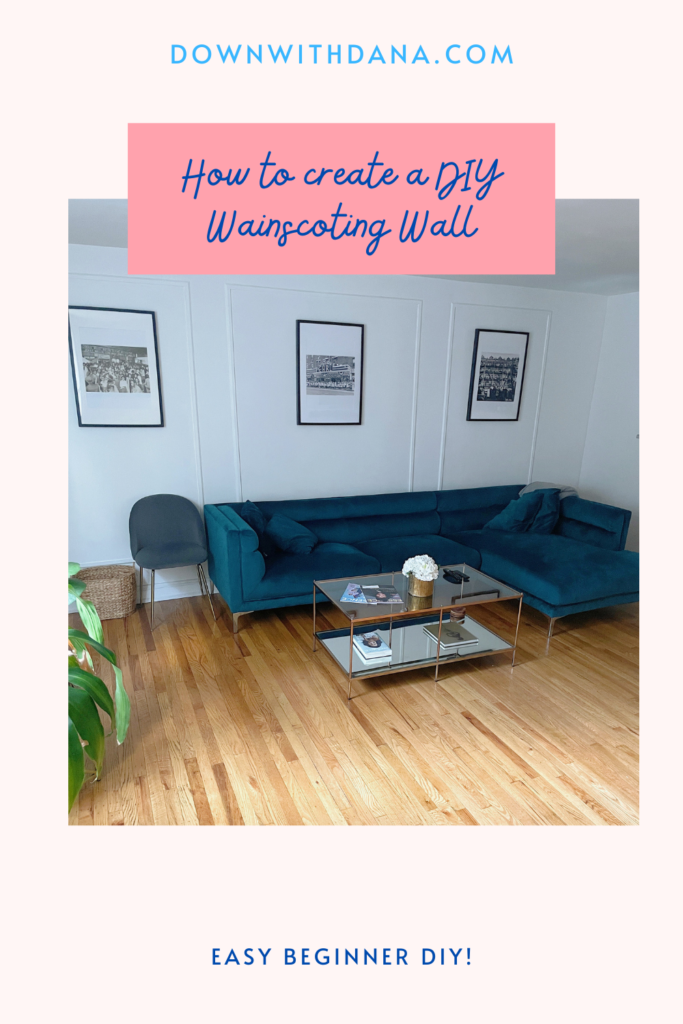
One of my first thoughts when I bought my house was that I wanted it to be uniquely Dana. No cookie cutter, plain stuff going on over here. I planned to add details that truly showed my personal style. I love mid-century and modern furniture pieces paired with accents that really bring everything together so once my contractor finished with construction in my kitchen and bathroom, it was my time to shine! Project number one was a diy wainscoting accent wall in my living room.
Can Wainscoting go anywhere?
My living room isn’t a very large space, in fact, there’s only one uninterrupted wall in it, so it was pretty obvious that any additions would be focused on that wall. Prior to buying my house I would scour the internet looking for inspo photos of home decor ideas and a lot of the images that really resonated with me had wainscoting accent walls. Wainscoting adds such a classic look to any room. In my opinion, there’s a certain je ne sais quoi to this type of design. It’s jazzy, classic, artistic and very simple at the same time. I think that it can be added almost anywhere.
Here are the steps that I followed to complete my diy wainscoting accent wall:
Supplies:
Moulding
Paint
- Measure the height and width of the wall
- Decide how many boxes you want
- Determine what size the boxes will be. I suggest sketching this in a notebook for a visual representation.
- Determine how much space you want above, below and between the boxes. Make sure your design is centered and has equal, symmetrical spacing
- Cut the moulding using your mitre box and saw to match the measurements that you decided on. Each box should have the same exact measurements so once you create one you just repeat that step until you have enough pieces to complete the project.
- Make markings on the wall with a pencil to guide your placement. *Use a spare piece of moulding and cut it down to size and use it as a template for your placement.
- Apply the adhesive to the back of the moulding and apply it to the wall.
- Let it cure for the recommended time on the adhesive label.
- Apply caulk to close any gaps and let it cure. I sealed the entire thing using caulk
- Paint
This project is extremely simple, but trust me, it will add sophistication and style to your space and it’ll look like a pro did it. Let me know if you tried this wainscoting accent wall and share your thoughts down below.